I was working on script which was supposed to run under scheduled task. That script was connecting to Graph API in Azure AD. Obviously, we can’t keep providing the credentials. What are the other ways to store this then?
- Store the credentials using Credential Manager
- Store the credential using Get-Credential command and pipe it to any local file.
- User Azure AD App Registration instead (Something like Service Account) which will authenticate using:
- Client Secret
- Certificates
We are going to talk about 3.b from above in this article.
Following things are needed.
- App Registration in Azure AD
- API permissions set to correct requirement and Consent Granted
- Certificate with Private Key (Can be self-signed or PKI based) with Base64 format.
- Script which you are using.
App Registration
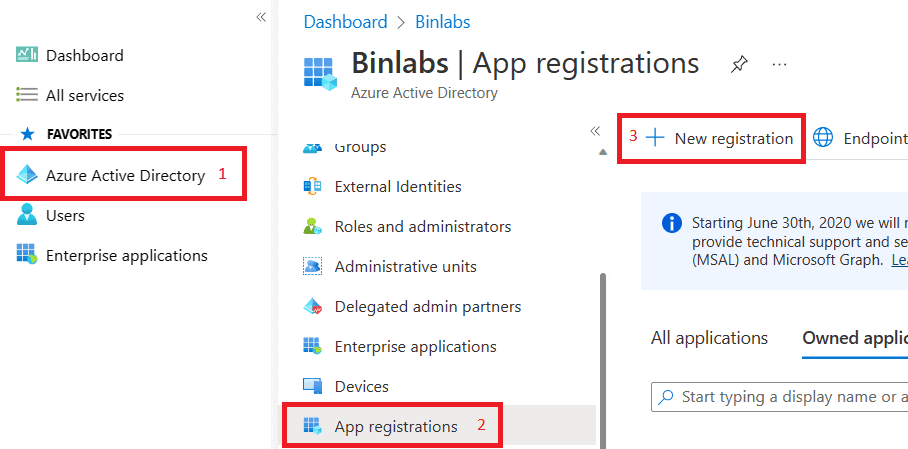
Open Azure AD (aad.portal.azure.com) and navigate to App Registration.
Click on New Registration
Provide a Name of your application and leave everything else as default.
Click on Register at bottom.
Now click on API Permissions.
Add a permission based on your need. Don’t forget to grant admin consent in this case.
At the end, it should look like following.

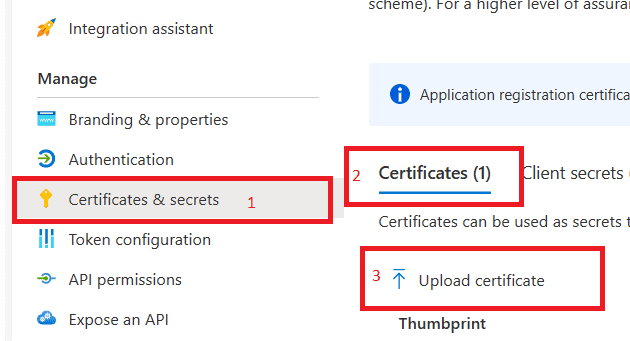
Once done, let proceed to add a certificate which has a Private Key in it.
If you don’t have any, use following command to generate a new one.
Let’s first initiate variables which we will be using in our commands later.
$Subject= "Hostname"
$CertLocation="C:\temp"
$CertName="MySelfSigned"
Following command will create a Self-Signed Certificate in Personal store of this machine.
$thumb = (New-SelfSignedCertificate -Subject $Subject -CertStoreLocation "cert:\LocalMachine\My" -KeyExportPolicy Exportable -Provider "Microsoft Enhanced RSA and AES Cryptographic Provider" -NotAfter (Get-Date).AddMonths(24)).ThumbprintSecuring the password in following command.
$pwd = Read-Host -AsSecureStringExporting the Certificate in PFX (With Private Key) format. Now since this certificate has private keys in it, password secured above will be used to secure this certificate.
Export-PfxCertificate -cert "cert:\localmachine\my\$thumb" -FilePath c:\temp\cert.pfx -Password $pwd Certificate is now stored in C:\temp of this machine by the name of MySelfSigned.pfx
The catch here is, PFX can not be uploaded directly to Certificates Section of our Azure AD app.
We need to convert it to Base64 using following command.
$cert = New-Object System.Security.Cryptography.X509Certificates.X509Certificate("$CertLocation\$CertName.pfx", "$pwd")
$keyValue = [System.Convert]::ToBase64String($cert.GetRawCertData()) | Out-File $CertLocation\$CertName-base64.crt
Now, at the same location, you can get one more file certificate which is Base64.
We are good to upload the certificate now.
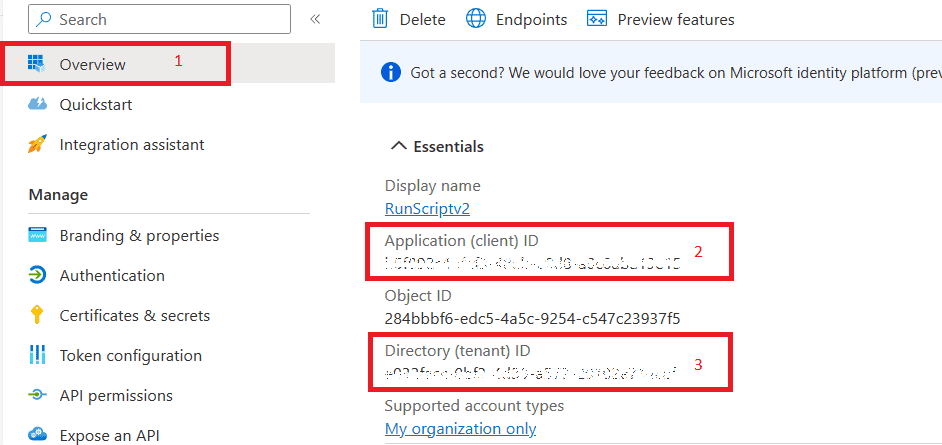
Once done, we need to capture the following information from same Application which was created in step mentioned above.
- Thumbprint of Certificate
- Application ID
- Tenant ID

$tenantID = ‘YourTenantID’
$applicationID = ‘YourApplicationID’
$thumbprint = ‘CertificateThumbPrint’

$Cert=Get-ChildItem Cert:\LocalMachine\My\$thumbprint

Connect-MgGraph -ClientID $applicationID -TenantId $tenantID -Certificate $Cert
Above command should let you to connect to Microsoft Graph using Self signed certificate. You can then use this script to plant anywhere for self-run without worrying about providing the credentials.
However, it is important to check the certificate life time (24 months in our example) and perform the cert replacement using commands above to replace the cert.
Hope this helps.
Happy Scripting.


Leave a comment